Roof Flashing: What It Does, and When Caulk Isn't Enough
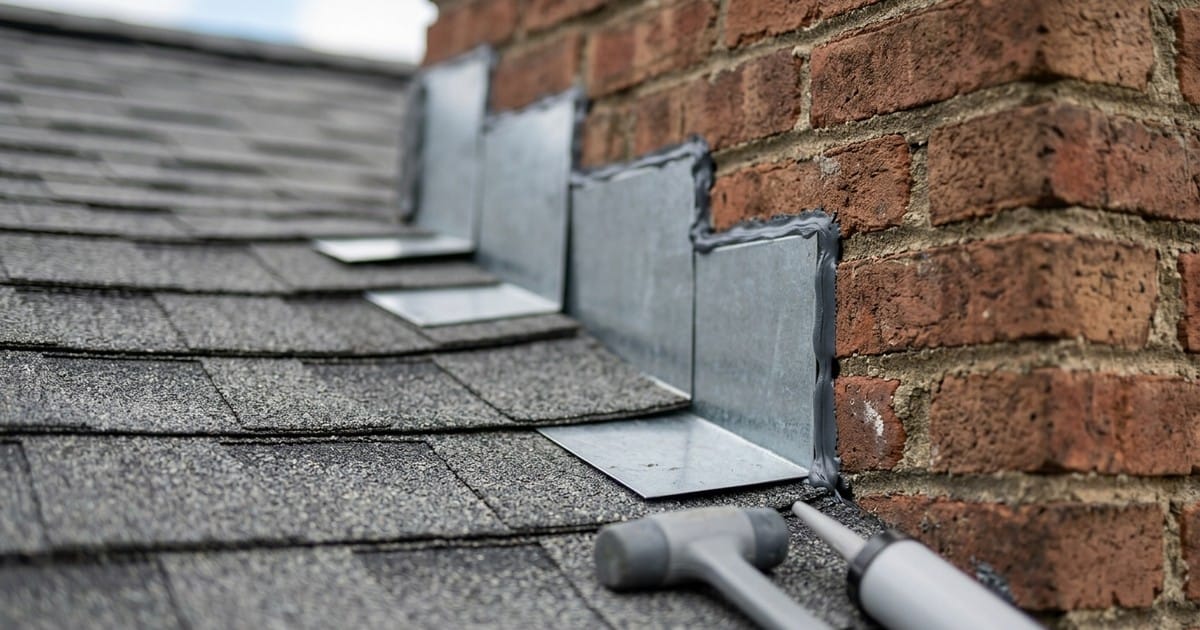
A tube of caulk over a cracked flashing joint feels like a fix. Often it's a delay. The National Park Service's own technical guidance on roofing is blunt about it: "repairs with caulking or bituminous patching compounds should be recognized as potentially harmful, since they are difficult to remove, and at their best, are very temporary" (NPS Preservation Brief 4, retrieved 2026-08-06). Flashing is metal for a reason — it's supposed to shed water by shape and overlap, not by sealant holding a gap closed.
The Flashing Types That Actually Matter
Four types cover most of what's on a residential roof, and each does a specific job.
| Type | Where it goes | Job |
|---|---|---|
| Step flashing | Roof slope meets a wall or dormer | L-shaped, one piece per shingle course |
| Counter flashing | Over base/step flashing at masonry | Sheds water past the step flashing's top edge |
| Valley flashing | Where two slopes meet | Carries the combined runoff of both planes |
| Drip edge | Roof perimeter (eaves, rakes) | Directs water clear of the fascia |
Step flashing is the one installation quality matters most on — it has to be woven in with the shingles, one piece per course, not run as a single continuous strip. A continuous strip in a step-flashing location is a common installation shortcut, and it's also a common leak source, since it can't flex the way individually lapped pieces do.
Open Valley or Closed — Does It Actually Matter?
Yes, and it's a real design choice, not just an aesthetic one.
An open valley leaves the metal lining visible down the center, with shingles on both sides cut back from it rather than covering it. Water runs down exposed metal, which is the most direct path off the roof and the easiest valley type to inspect for wear. The National Roofing Contractors Association's own guidance for open valley linings on asphalt shingle roofs specifies a minimum 18-inch-wide metal lining, with a center rib or splash diverter at least 1 inch high running down the middle to keep runoff from one slope crossing under the shingles on the opposite slope (NRCA, retrieved 2026-08-10).
A closed valley — sometimes called a woven valley when the technique involves interlacing shingle courses from each slope across the centerline — hides the metal lining entirely under the shingles. Nothing is visible from the ground, which is the appeal, but it depends much more heavily on installation precision: shingles have to be cut, lapped, and sealed correctly at the centerline for the covering to actually be continuous, rather than just cosmetically closed.
Neither type is universally "better" — open valleys are easier to verify and tend to handle heavy runoff more predictably, while closed valleys read as a cleaner roofline. What matters is knowing which one is on your roof and, for an open valley, whether the visible metal is actually sized to NRCA's minimum rather than a narrower strip that looks fine until a heavy storm proves it isn't wide enough.
What Does Building Code Actually Require Here?
More than most homeowners assume, and it's worth knowing before you take a contractor's word for it.
The International Residential Code requires flashing at wall-and-roof intersections, anywhere the roof changes slope or direction, and around any roof opening (Section R903.2, retrieved 2026-08-10). One specific, commonly-missed piece of that requirement is kick-out flashing — a diverter installed where a sloped roof's eave meets a vertical sidewall, required under R903.2.1 to project at least 2.5 inches and route water away from the wall rather than letting it run down behind the siding. Missing kick-out flashing is a well-documented cause of hidden wall-cavity water damage, precisely because the wall looks fine from outside while rot builds up behind it.
Where metal flashing is used to meet these requirements, code sets a real floor on the material itself: corrosion-resistant metal at least 0.019 inch thick, equivalent to 26-gauge galvanized steel. That's a minimum, not a target — it's thin enough that a contractor cutting corners on gauge can still technically clear the code bar while installing flashing that dents, oil-cans, or wears through faster than a heavier gauge would.
What Metal, and How Thick, Should Flashing Actually Be?
Code sets the floor. The industry's own reference sets the working standard most quality installers actually use.
SMACNA's Architectural Sheet Metal Manual — the trade's standard reference for flashing and sheet metal work — is where most of those working specs come from. Typical residential flashing runs 24- to 26-gauge for galvanized steel, about 0.032 inch for aluminum, and 16- to 20-ounce cold-rolled copper (ASTM B370). None of those are dramatically thicker than code's 0.019-inch floor, but the difference between a 26-gauge minimum and a 24-gauge working spec is real in the field — thicker metal resists denting, holds its shape better around bends, and simply lasts longer under repeated thermal cycling.
That thermal cycling is worth taking seriously on its own. Metal flashing expands and contracts with temperature — enough that a rigidly fixed fastening point can eventually loosen fasteners or crack a joint that was installed perfectly on day one. The fix isn't a stronger fastener; it's a fastening method that lets the metal move: oversized or slotted fastener holes, sliding rather than fixed clips at longer runs, and a deliberate 1/8- to 1/4-inch gap at spliced joints to absorb movement rather than fight it (PAC-CLAD, retrieved 2026-08-10). This is the mechanical reality behind the "thermal stress" failure cause the National Park Service names above — it isn't abstract; it's a specific installation detail that either accommodates the metal's movement or eventually fights it and loses.
Why Flashing Fails
Not usually because the metal itself wears out first.
The National Park Service's roofing guidance names the real causes plainly: flashing "should be carefully inspected for failure caused by either poor workmanship, thermal stress, or metal deterioration (both of flashing material itself and of the fasteners)" (NPS Preservation Brief 4, retrieved 2026-08-06). Poor workmanship — laps facing the wrong direction, missing overlap, a continuous strip where step flashing belongs — is often the actual root cause, not age.
That fastener deterioration is a real, specific risk, not a vague footnote. The industry's own technical guidance on metal corrosion is direct that copper "has a very severe corrosive effect on steel, aluminum, and zinc," and that fasteners are held to the same metal-compatibility rules as the roofing panels themselves (Metal Construction Association, retrieved 2026-08-06). A copper gutter draining onto steel flashing, or the wrong fastener metal used to install it, can corrode the joint faster than the flashing itself would ever wear out on its own. Our metal roof cost guide covers this galvanic corrosion risk in more depth for roofing panels generally.
When Is Caulk Enough, and When Isn't It?
Caulk buys time. It doesn't fix a design or installation problem.
A hairline crack in otherwise sound, correctly installed metal flashing is a reasonable case for a caulk touch-up as a stopgap. But caulk was never meant to be the water barrier — the metal's shape and overlap is supposed to do that job, with sealant as backup, not the reverse. When a flashing joint depends on sealant alone to stay dry, that's the sign of a design or installation problem underneath, not a maintenance item, and re-caulking it every few years is a symptom you're treating repeatedly rather than a fix.
The real repair in that case is re-detailing: correcting the lap direction, adding the overlap that should have been there, or replacing corroded sections — not another bead of sealant over the same joint. Our roof leak repair guide has the actual repair cost ranges by leak type, including flashing repair specifically.
Re-Detailing or Resealing? Ask Directly
The answer tells you whether the job addresses why the joint failed, or just delays it again.
Ask whether the fix is re-detailing the flashing or resealing the existing joint. Those are different jobs at different price points, and only one of them addresses why the joint failed in the first place. If step flashing is involved, ask whether it's being replaced piece-by-piece with the shingles or run as a continuous strip — the continuous-strip shortcut is cheaper and faster, and it's also the installation error that causes step-flashing leaks in the first place.
Frequently Asked Questions
Is it normal for flashing to need resealing every few years?
No — that's usually a sign the flashing itself isn't doing its job through shape and overlap the way it should, and sealant is compensating for a design or installation issue. A properly detailed flashing joint sheds water mechanically and doesn't depend on fresh caulk to stay dry.
How long does flashing actually last?
Well-installed metal flashing can outlast several roof coverings, since it's the fasteners and sealant, not necessarily the metal itself, that fail first. Poor workmanship at installation is one of the most common reasons flashing fails well before that — which is why installation quality matters more than the metal choice alone.
Can I just add more caulk if a flashing joint is leaking?
You can as a temporary measure, but treat it as exactly that. A joint that keeps needing sealant is telling you the underlying lap or overlap isn't doing its job, and repeated caulking without addressing that will keep failing on the same schedule.
Is an open or closed valley better?
Neither is universally better — open valleys are easier to inspect and tend to handle heavy runoff more predictably, while closed or woven valleys hide the metal for a cleaner roofline but depend more on installation precision. What matters most is that an open valley's exposed metal actually meets NRCA's 18-inch minimum width, not just that it looks adequate.
What is kick-out flashing, and why does it matter so much?
It's a small diverter installed where a roof eave meets a vertical sidewall, required by code to project at least 2.5 inches and route water away from the wall. Without it, water runs down behind the siding instead of off the roof, and the resulting rot builds up inside the wall cavity where it stays hidden until the damage is significant.
What do you want to do next?
Three ways we can help from here.
Get the free contractor checklist → 7 questions to ask any roofer before you call. Know what to ask, and what a good answer sounds like.